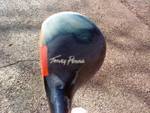
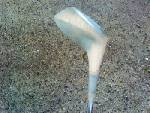
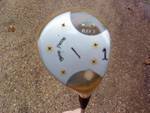
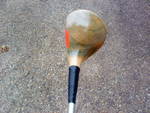
I picked up a nice deep-face Penna a couple of months ago that was in decent shape (but not perfect). I decided to make it my first attempt at flattening a persimmon driver. Moved this one to 5 flat (about 50 degrees). As hard as I tried I couldn’t get all of the original black finish sanded out. Rather than re-stain it I decided to leave it as is and go with just a clear coat finish (I don’t imagine you’ll see many Pennas this color) .
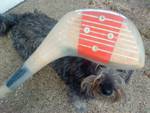
Stuck a new X100 in it and hope to give it a test-drive this week.
Great job Robbo - I am very impressed. I am sure even Lag would love to have a TP Mod JS flat like that. What was the trickiest bit of the process from your experience?
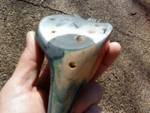
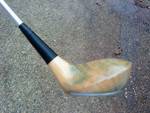
The shaft removal can be dicey but I was lucky with the pin on this one and was able to drill it out without much trouble. You have to use a drill bit that will take care of that hardened steel pin. I was working on a Cleveland Classic 4-wood at the same time and had similar luck drilling the pin out of that one. (I’ll post some pics of that one later).
Perhaps the trickiest part is the re-drilling of the new hole in the head. As Lag says… you need to “go slow”. It took me 2 tries to get the new hole angled properly in the 4-wood. I was paying so much attention to the lie angle that I missed getting the “open or closed” angle direction drilled properly (if that makes sense). You’re really working in 3-dimensions so you have to be aware of those “other” dimensions as you drill.
Also, when filling the hole with the epoxy/sawdust mixture you need make sure you get the air bubbles out as you fill. You’re packing a hole with the pasty mix and the air has no where to go if you tape the bottom and/or pin holes up before you start filling so pay attention to that.
There is some elbow grease involved but all in all it’s a pretty straightforward process. Lag’s instructions are excellent.
Could you elaborate on how you manage to get the pins out please.?? I have removed quite a few now using Lags method, and it is nearly always a struggle with the big scar to boot.
Just saw your question, so sorry for the delay in replying.
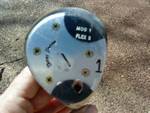
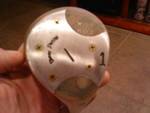
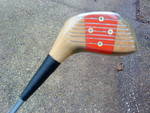
As you might be able to see with the Penna, it was a bore-thru shaft, as have most of the persimmon mods I’ve done. In those cases I was able to drill up from the bottom of the shaft (thru the wood plug) and drill “through” the pin which essentially splits the pin in two (I think I use a 1/4 or 5/16 drill). Most of the time the head of the pin pops up so you can easily pull that piece out. The other part of the pin that’s left in the head has to then be “punched through the shaft”… I did it by enlarging the pin hole slightly and using a punch and hammer to drive the remainder of the pin into the head enough to clear the shaft. That part of the pin remains in the head.
Right, cheers, thanks for that, will give that a go next time.
Most of the ones that i have done have not been bore thru shafts, but i have just got my hands on some longer drill bits, so it should be possible do that from the shaft end now.
How is your lacquer holding up? Feel like i need to get my hands on something better.