Folks,
I either really suck at this, or it is much harder than you guys that are having success are making it look!!
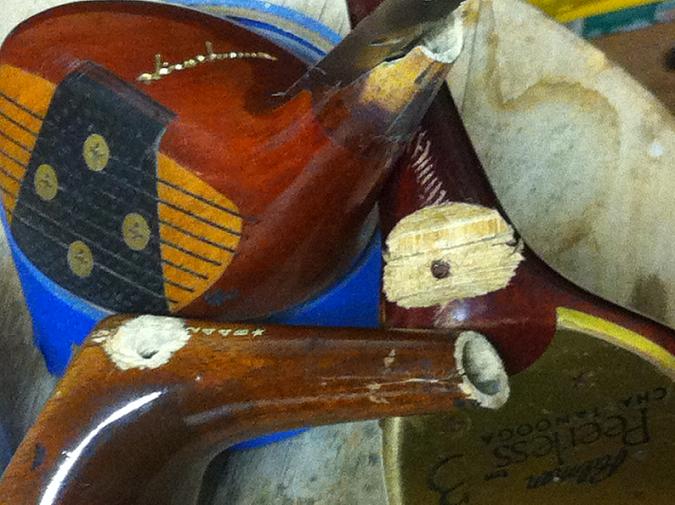
All of the below did not need refinishing, were decent blocks, but far from vintage jewels…so I thought reasonable candidates for flattening…
Take 1: Hiro Honma Persimmon Driver, junk graphite shaft drilled out succesfully…no pin to sweat, I had a 3/8 ’ oak dowel, go to GRADUALLY ream the neck to the same diam. to fit the dowel, and the neck cracks…TRASHED…
Take 2: Palmer Peerless early eighties Persimmon 3 wood… not thru bores so I think, Ill drill out the pin…apparently not the right path according to Lags tutorial, but give it a go anyways, succeed only in obliterating the pins head, and the amount of wood I had to remove to get vise grips on what remained of the pin pretty much ruined the neck… again TRASHED…
Take 3: HB Citation Horseshoe 4 wood, again not a thru bore so do not attempt to drill from the sole up to the pin…so… make a nice surgical material removal around the pin get vise grips on it… and … again trash the head of the pin!!
But after my experience with take 2, I decide to drill thru the sole, manage to drill thru the pin, remove the top half of it,
I attempt to drive the remaining half of the pin into the head with a nail set punch, get the shaft out but soon discover the shaft broke off on the end and was simply unable to get it out…RELEGATED TO THE LANDFILL
I know have 5 decent persimmons left from my thrift storage foraging, and to say I aM reluctant to sacrIfice these in more attempts is an understatement…!!, I do feel a little better just typing this out hoping others can relate !!
Any one with enough patience to read this rant with any sage advice please respond!!
thx all
daleheck
I think by biggest mistake was trying to go 3/8" bore on the neck … period…especially before filling old bore with material…
I had a fantasy I could get this 3/8 oak dowel I had laying around to fit and all would be well…
After some consultation with ‘mdrretired’… he agrees that 3/8" leaves the wall thickness of the neck too thin…
thus the cracking of the necks…
I PM’ed him and he suggested measuring existing bore 1st, than sizing a corresponding dowel, boring slightly if necessary, epoxy the dowel (if electing not to go epoxy and sawdust)… than rebore with graduating 4 drill bit sizes to a size close to the actual shaft new diameter…in this case tipped .335 DG X100 wood shaft…
Still struggling with technique on removing pins !!
Best way to get the pins out is to drill them out. If they aren’t bore thru then leave about 2" of shaft (so you have something to grip in the vice when you pull the shaft) and drill down the shaft from the top. You need quite long drills bit to be able to do that. Use smaller bits at first and nibble the sides of the pin to weaken it, dont try and do it all with 1 thick bit. Its quite easy if you have the good drill bits.
I reckon you can salvage those if you fill them with epoxy and saw dust. Remove any loose wood and drill a hole beyond the end of the cracks so the epoxy will fill it. If they arent bore thru, the drill a hole thru the bottom of the club so the can escape.
Don’t feel bad. What you are trying to do is advanced club making/modifying. I’ve done one persimmon rebore to get a flatter lie angle. A MacGregor Tourney driver. If you don’t have a bore thru to get to the pin from the bottom and you don’t mind ruining the shaft that is currently in the persimmon, just cut it off a few inches from the top of the hosel. That’s what I did since I needed to put in a stiffer shaft. You can drill the pin out from that direction. I used a small drill bit and drilled in the middle of the pin. That left enough of it to be able to use a screwdriver and push the pin from the inside to pop it out. No wood at the pin area needed to be cut out.
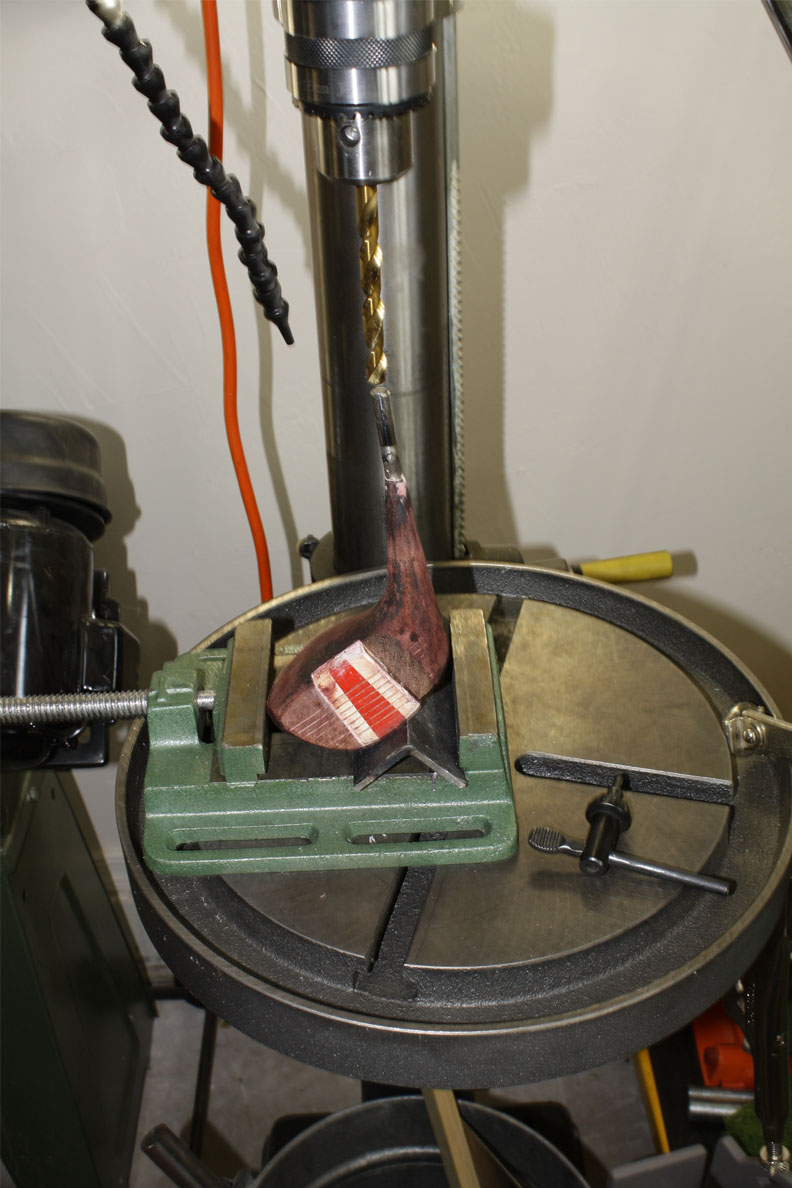
I filled with epoxy/sawdust and let it dry then did the multiple drill bits in a drill press to make a good bore through. I had the head sitting in a clamp vise and had it sitting on a piece of angle iron that made it sit at 45 degrees. I shimmed it up to add about 4 more on it. Drilled it out, took it off and dry fit the shaft.
I measured out the lie angle and it was like 43 degrees. DOH! I shimmed under the heel, should of shimmed under the toe. Had to re-epoxy and let dry. Had to go through the whole re-bore thing again.
I now have it sitting at 50 degrees. I reshafted it and put a nice long ferrule on it. I built up the neck again with epoxy mixed in a little wood filler. (Don’t put too much in or it turns into peanut butter). This made the neck long and smooth and tapered without that goose neck look it will have since the shaft is coming in at such a lower angle. Sanded it down and smoothed it to look seamless.
It is now ready for staining, clear coating and whipping. Need to get busy on it again.
I don’t know if you were hand drilling without a decent clamp but I will say that having the proper tools and doing things deliberately and slowly will make things go alot smoother.
Dale, here is a quick pic of a mock up of the drill press setup I talked about earlier. I used a cracked up head to model. Obviously, you would get take out the shaft tip and fill the hole with epoxy/sawdust or a dowel. I used cardboard to protect the toe/bottom of the head from scratches. Since the angle iron is 90 degrees and sitting down like that it is effectively 45 degrees on each side. You can add shims under the toe to add loft making it 48-52 degrees. Don’t make the mistake of putting the shims under the heel, you will get less loft <45 degrees. Don’t ask me how I know
You want to start out with a small drill bit and move up in sizes as you go. I use about 4-5 sizes to get up to the final size. You don’t really clamp it tightly in since the pressure down keeps it in place. Yes, I know, not the best way or safest but there really is very little pressure downward and this is a very slow speed on my drill press (it’s for metal drilling). I think it works out similarly to the way you have yours setup with your clamping device.
My feeble engine- erring efforts have not produced a solid platform for drilling these…
I appreciate the response!.. that looks like a tidy little rig, better than the thing I posted a few months back!..
I will see if I can make a similar set up .